
Wiring a wall socket makes a fun project for the DIY home improvement fan, and it’s one of the more complicated tasks that an average homeowner can comfortably handle on their own. As it involves wiring and sometimes tools besides a screwdriver and pliers, however, feel free to call an electrician to make sure it gets done safely and correctly.
It’s best to replace a wall socket if the current one has become loose, feels hot, or appears burnt or melted. You can also switch from an old wall socket to a modern one if you want to add an outlet and light switch combo, an outlet with USB charging ports, or other fancy models — just be prepared to cut a larger hole if switching to a larger wall socket.
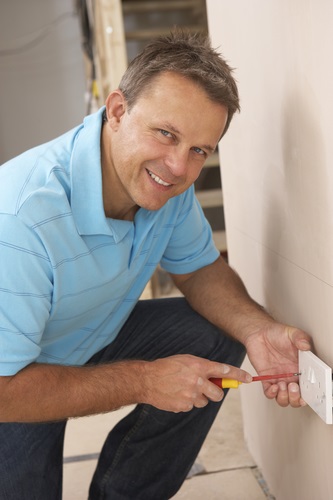
Remove the Old Wall Socket
First, make sure that power is off (use a voltage tester — don’t just flip the circuit). Then unscrew the face plate and set it aside or discard it. Then unscrew the mounts and carefully pull the outlet through the hole so you can work with the wiring.
Cell phone pictures are great for noting the wiring placements. Generally you will be looking at a white neutral wire to a silver screw, black hot wire to a gold screw, and a green grounding wire to a green screw.
Loosen the screws to detach the wiring. If the outlet has push-in connections, hold the wire and twist the receptacle around until the wire breaks free, or just cut it off with wire cutters.
Wiring a New Wall Socket
Get rid of any frayed or mangled wire ends — cut them off so you have a clean, fresh length of wire at the tip.
If needed, strip the wire a bit. You only need to strip enough insulation so that you have just enough bare wire to wrap around the terminal screw or stick into the push-in connection. The box or its packaging probably tells you how much — usually about 1/2” or 3/4”.
Wall socket with terminal screws: Hook the wire end into a question mark shape using pliers or the loop maker that might be found on your wire stripper tool. Place the hook around the appropriate screw (white to silver, black to gold, green to green) and tighten the screw. Make sure that the wiring is tightly, securely under the screw.
Wall socket with stab-in connector: This method is handy, but these connections are not recommended. The clamps allow the wire to jostle loose over time, causing the risk of arcing and overheating. If you use them, be sure to push in the wires and clamp them down as securely as possible.
Before mounting the wall socket and attaching the face plate, double-check that the hot, neutral, and ground wires are connected to the proper terminals. The wires should all be very tight and the screws firmly in place.
At any point in the process, if you feel less than confident about the wiring locations or connection quality, do yourself a favor and call an electrician to finish the job. It’s a small, fast job for a professional and you won’t have to worry about sparking or short circuits later. Contact us and we can get the job done for you.